First published in the August 2007 issue of Street Machine
There are all sorts of products available to get your car to hook up, depending on what it is. For the most part, the systems available are designed to counter shortcomings in factory set-ups as far as racing is concerned. However, there comes a time when the potential of a factory-based system reaches its limit, no matter what modifications are applied.

At this point, a rear end designed for racing with far less compromise than a factory-based diff/chassis set-up becomes necessary. A four-link installation, such as the one seen here, is the ultimate answer to most rear-end needs in high-performance applications. In the past, such a rear end was always a full custom job, but these days McDonald Brothers Racing has introduced pre-built, four-link rear clips that take a great deal of the pain out of installing such systems. Obviously, as the photographs show, it’s still a major custom job, but some of the really hard parts are now done at the factory, and many reasonably competent car builders could tackle the job of installing one of these kits. Here’s an overview of how to
do it, courtesy of Les Baldi and his tough EH (SM, August 2007).
STEP-BY-STEP:

- 1. As described, this particular unit was assembled in the car, so only the basic frame was fitted as a complete unit, as shown here. Basically, an area the same size as the clip must be cut out of the car. The rear of the clip forms the reference point for the installation. We’ll talk a little more about cutting away factory metal shortly.

2. .Measurements to establish the position of the clip are taken from major undamaged structural elements of the car, rather than panels. Long diagonal measurements from the firewall back to various sections of the clip are the most accurate. Shorter measurements like this are useful, too. Here, the clip had to be moved across about 15mm. A large G-clamp works well for this.

3. Aligning the clip with body panels may result in an aesthetically pleasing job, but if the panels are out, the car may not run straight. Using undamaged structural elements ensures proper alignment; however, any resulting panel misalignment must be fixed later on. Note that long sections of the clip are stitch-welded to the body to stop the progress of any cracks that might occur.

4. At points where the clip makes contact with the body in concentrated areas, reinforcing plates are first stitched to the original body. Then, after the correct position of the clip is confirmed, the clip is tacked in place at all points of contact with the plates and body. After the clip is firmly tacked at all points, the final welds can be applied.

5. Originally, the area cut away was just big enough to accommodate the clip. Once the clip is tacked into place, other sections of the original body, like the wheelarches and floor section of the boot shown here, can be cut away. An oxy-acetylene set is a very quick method of making the cuts, although some fabricators we know use cutting discs in small grinders.

6. Here’s the passenger side cut away in preparation for the tub. Be careful not to set any body deadener on fire when cutting. In fact, it’s often best to have an observer on hand to spot such things. Cuts should be cleaned up with an abrasive disc on a grinder. Paint, body deadener and rust should all be removed from areas that will be welded.

7. This car already had underbody reinforcing. In this shot, you can see where it terminates. In such cases, the rear clip has to be firmly connected to the existing reinforcement. If this isn’t done, the area where the two separate reinforcing systems meet (but aren’t connected) will become a highly stressed weak point, in severe danger of failure.

8. Here, you can see how the boys at McDonald Brothers united the existing underbody strengthening rails with the new rear clip. You can also see how short sections of the factory bodywork are welded to the clip. In shorter welds like this between the clip and original bodywork, stitch welding is not so necessary.

9. The exact size of your tubs depends, obviously, on the size of your wheels and tyres. This is determined at the time of ordering. Here, Chris is showing how to make a template to match the remaining wheelarch to the tub. However, McDonald Brothers already has templates for most cars, so you probably won’t have to do this.

10. The company has a unique folding machine that makes these interlocking edges. All tubs sent out already have these folds applied, so all you have to do is to push them together and tack them in place until final welding. The panels are, however, shipped flat, so you’ll have to roll them to shape, or have it done for you.

11. Once the panels are rolled to shape and set in place, the job really starts taking shape. Note that the panels are sitting flat on the RHS sections. This is because the welds on the RHS have been ground flush with the surface. Ordinarily, welds shouldn’t be ground, but special steps have been taken here to make it possible to do this safely.

12. Here’s one way to bend/roll a panel with a folded edge. The cuts can be weld-filled later on. There are small shrinking/stretching machines that either stretch the folded edges (which would have been necessary in this case), or gather it up. These actions can also be undertaken by hand, and are skills worth learning – but that’s another story.


13. Although welds generally shouldn’t be ground flat, these pieces are especially prepared to make this possible. Penetration is essential, so a gap is left between the pieces, as shown, and the edges are chamfered. Three main types of weld are required to fit one of these clips. There’s RHS to RHS, sheet metal to sheet metal, or the most difficult – sheet metal to RHS.

14. Here’s all the tin work, done and ready for caulking. Ray McDonald explained that this car was to retain its rear seat and that many people make that request. This means that a triangulated four-link set-up must be used, because there isn’t enough room for the upper bars to be parallel, as they are in the ideal four-link system.

15. Chris used K&H Brushable Seam Sealer to seal the joins. After this was done, the whole clip was coated with K&H spray-on underbody deadener. The entire job seen here, installation included, is worth about $9500. This shot also shows a close-up view of how much the welds in the RHS are ground down.

16. McDonald Brothers supplies all the sheet metal, apart from the tubs, in two sections. This makes installation easier, and also makes it easier to cut out sections to fit other components, such as the aluminium fuel tank. The strengthening ridges are already rolled into the sheets supplied, and are used to line up the sheets during fitting.
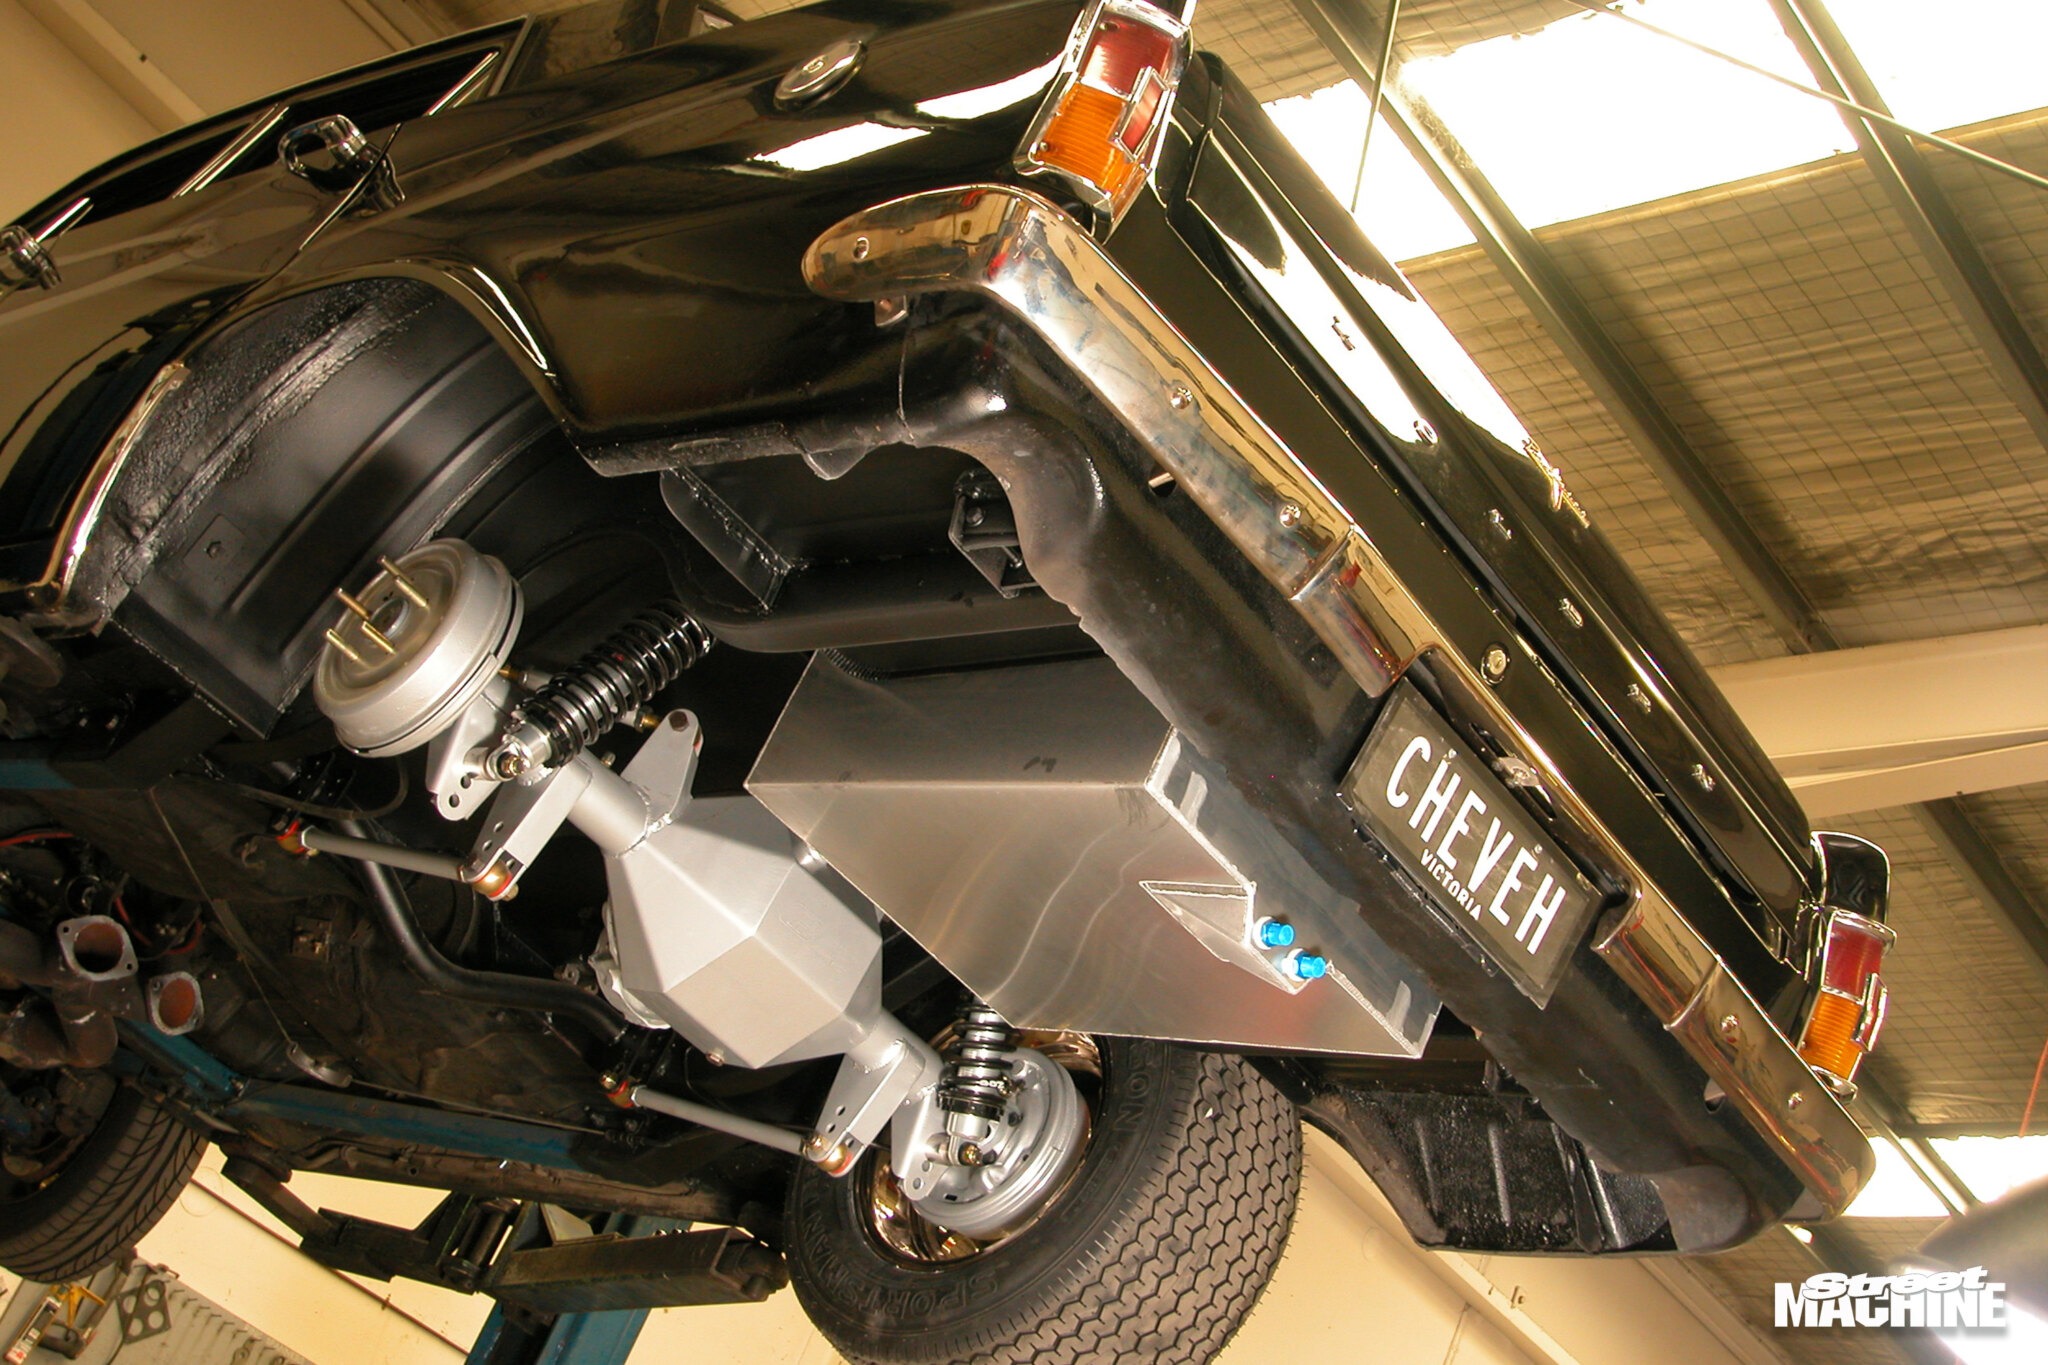
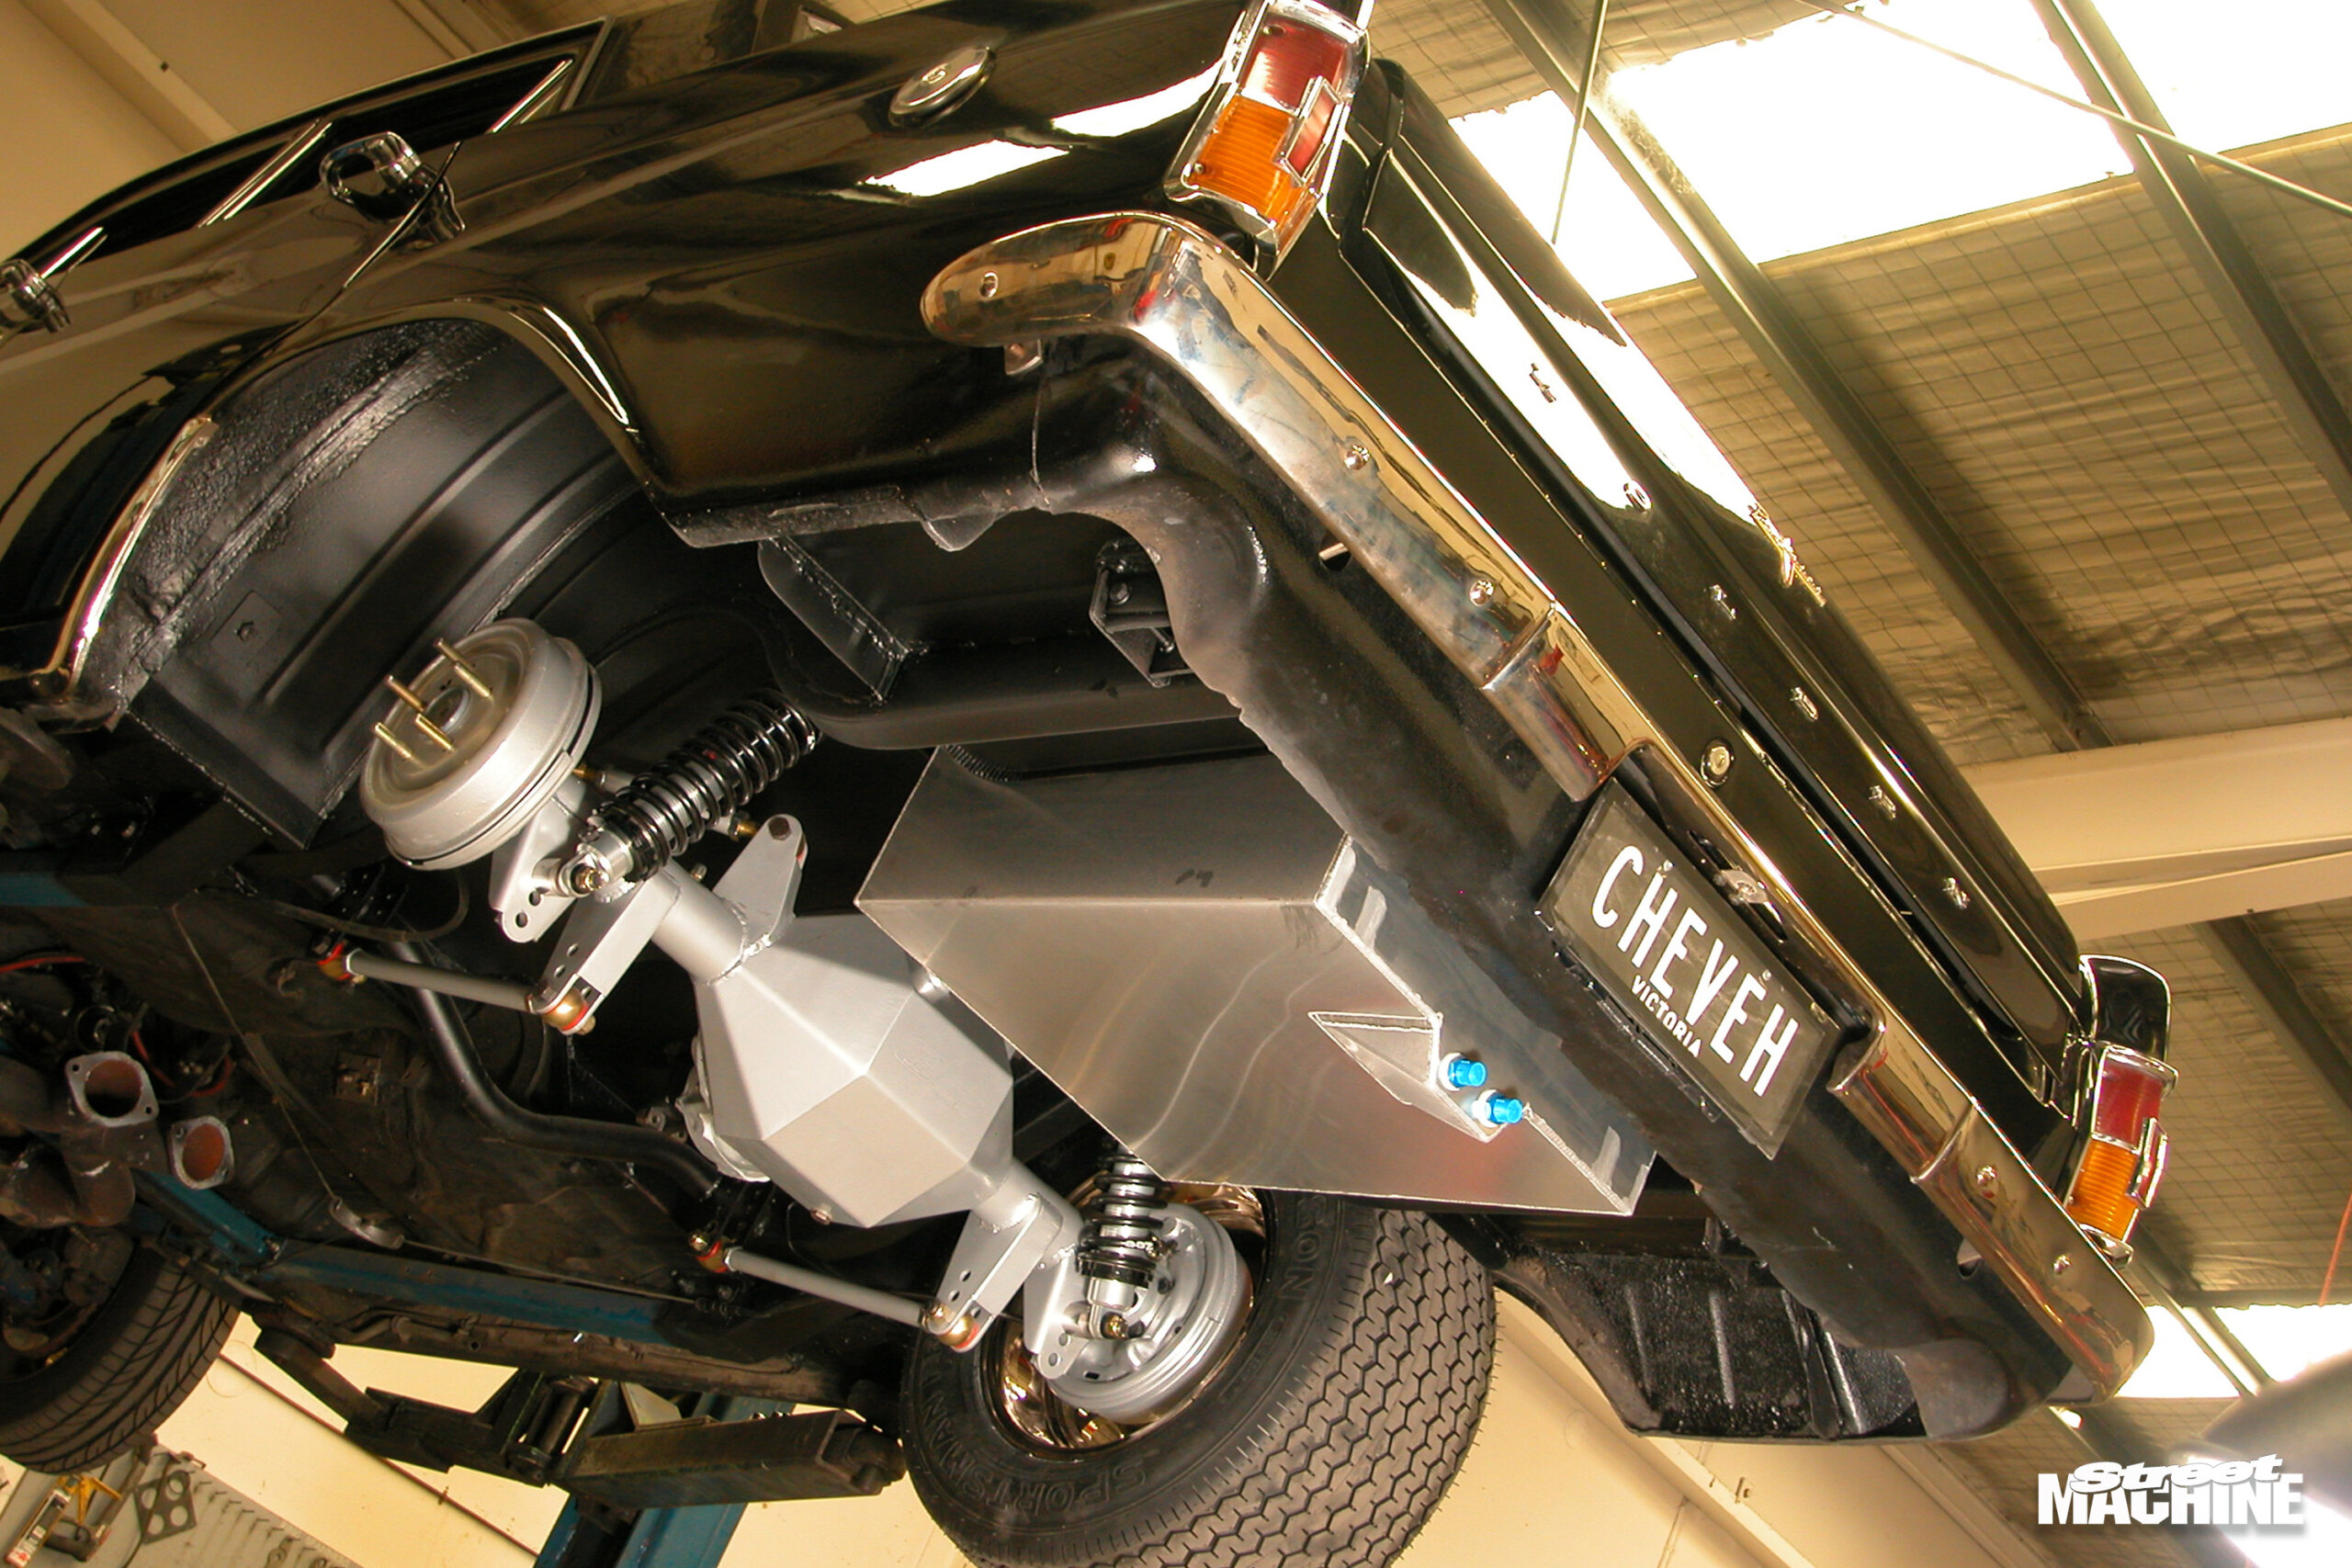
THE FINISHED INSTALLATION
As we mentioned, the splayed top bars are necessary because the rear seat has been retained. Now, the car is set up properly for the twin turbocharged power that’s going to be fed through this assembly when the new engine is completed. This installation uses QA1 shock absorbers, but other options include Spax steel units or a non-adjustable 50/50 budget unit. Of course, there’s nothing to prevent you from supplying your own shock absorbers.

The link bars are available in mild steel for budget applications, stainless steel for those who want to polish the finished result, and chrome-molybdenum for the greatest strength. Chrome-moly actually weighs the same as steel, because it is steel. However, it’s much stronger than mild steel, so thinner tube can be used, and this is what makes it lighter. Even though thinner sections are used, Ray says it still ends up about three times stronger than mild steel in a given application.
For further information, call McDonald Brothers Racing on 03 9465 0000, but visit its website first, at
www.mcdonaldbrosracing.com.au.

Comments