
First published in the October 2003 issue of Street Machine
VUFORU’s sound system
Go to: Tweeter Pods | Door buildouts
No cruiser is complete without some pumping tunes, so we hooked up with JVC Mobile Entertainment and Cronulla Car Sound to rectify the situation. Prior to taking pride of place in some lucky reader’s garage, VU FOR U has been hitting the show scene in earnest. Therefore, not only did we want a system that sounds sweet, it also had to have plenty of head-turning oomph to attract attention. A tray full of speakers and amps was immediately ruled out as too crass; instead, we opted for a street-neat system contained wholly within the cabin.

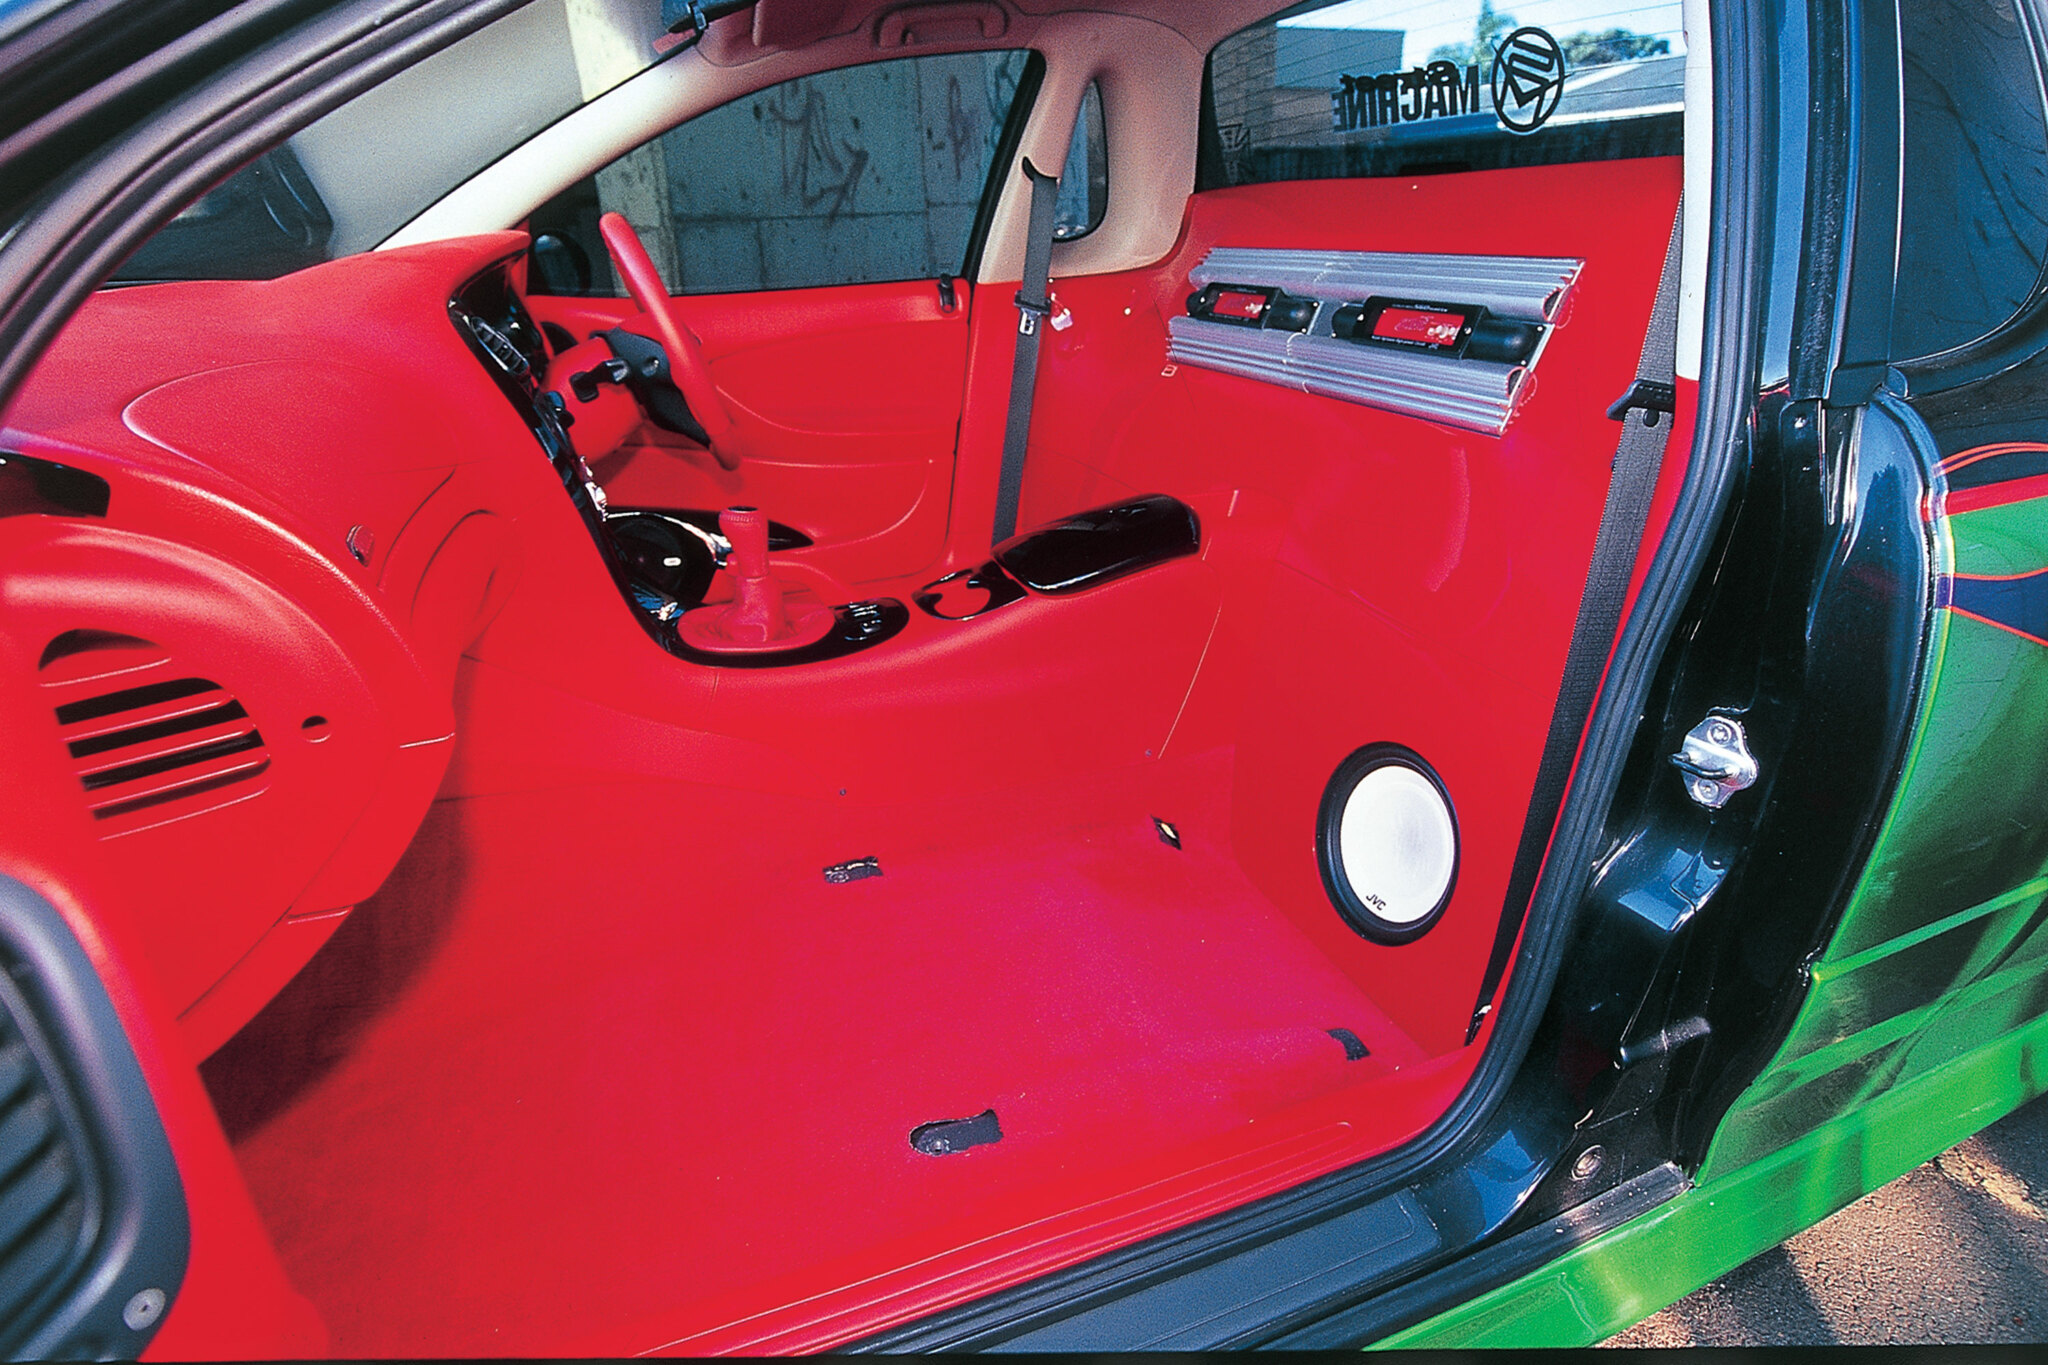
After considering the options and available space, the system design looked like this; MP3/CD/tuner in the dash, two 10-inch subs behind the base of the seats, two pairs of splits (two mid-bass drivers in the doors, two sets of tweeters up on the dash) and two, four-channel amps (mounted high on the rear firewall) to power the whole shebang.
To make it look a treat, all the gear would be housed in a curvy MDF (medium density fibreboard or craftwood) and fibreglass panel finished in matching red two-pack. While the door build-outs and tweeter pods would be moulded into the existing factory panels.
AMPS AND SUBWOOFERS

1. The amps could have been screwed directly to the bulkhead, however, the screws would have protruded into the tray – bad. Therefore, a 3mm sheet of aluminium (with a 6mm piece of MDF sandwiched in between) was bolted into place to form the new amplifier mount. Note: the bolt heads were placed on the tray side for neatness.

2. Power amplifiers are big and heavy. With them being positioned right behind the seats, it’s important that they are mounted very solidly. Steve from Cronulla Car Sound ensures the four self-tapping screws securing each amp bite into the aluminium nice and tight guaranteeing neither amp becomes a projectile in the event of an accident.

3. Amazingly, JVC’s CS-LD3250 10-inch subs will work in enclosures as small as 30-litres. Fortunately, Holden endowed the VU with more than enough space behind each seat to accommodate such an enclosure. The sturdier the enclosure, the better the bass response. We used 16mm MDF but 18mm is preferable for larger enclosures.

4. Escaping air reduces bass output, so all the panels were screwed and glued with PVA wood glue for a sturdy, air-tight enclosure. Front panel attachment is left until last which facilitates mounting the enclosure and allowed us to cut the subs mounting hole to suit the cover panel. This ensures the subs end up neatly centralised.

5. Next we construct the cover panel to go around the amps and subs. The game plan is to stretch T-shirt material over a shaped frame, paint it with fibreglass resin to make it stiff and hold its shape, then fibreglass the back for added strength. Stiff cardboard is easy to cut, and perfect for making templates for the MDF frame.

6. Here is the finished 6mm MDF frame. It’s to this frame that the T-shirt material will be stretched across and stapled to. Note how the frame around the amps and has a step routed into it’s edge so the finished panel will sit flush with the top of the amps.

7. This stretched cloth method makes it easy to form very complex curves that flow nicely into each other. T-shirt material is used as it stretches in both directions. It’s important to ensure there’s no gathers or ripples in the cloth. The material needs a reasonable amount of tension to stop ripples from forming when it’s wet with resin.

8. Go easy when mixing the resin; too much hardener (hot) will buckle the cloth, insufficient hardener and the resin won’t go off (set). Prepare manageable 500ml lots and use a disposable paintbrush to completely wet all the cloth. The masking tape and drop cloth is there to stop resin from getting on the trim.

9. Give the resin a solid eight to 10 hours to dry, then yank the panel out and start reinforcing it from the rear using chop-strand fibreglass mat and resin. To stop the panel from warping, give the panel just one layer and allow it to dry before adding a second and third layers.

10. To minimise warping and ensure the panel keeps its shape while the resin hardens, screw it back into place after the application of each layer of fibreglass. There’s no way to completely prevent warping so be prepared for plenty of filling and sanding.

11. The original intention was a one-piece panel however, it quickly became obvious this would be impossible, so we cut it into a single upper half, and two lower halves. Look closely and you’ll see the Jaycar grille snaps that secure the lower covers to the front of the enclosures.

12. This is easily the most time-intensive stage with many hours spent applying plastic body filler (bog) and sanding it smooth. High spots must be ground down (use a four-inch angle grinder fitted with an abrasive disc), while low areas need to be filled. Have plenty of patience, refit the panel when applying thick layers of bog. It’s a very dusty job so only sand in a well-ventilated area.

13. For a high quality finish, the pre-painted surface has to be perfect. Painting reveals even the slightest imperfection, making them very noticeable after it’s too late. When sanding, continually rub your hand over the area to make sure you have nice smooth-flowing curves with no bumps or lips, especially where fibreglass and filler meet. Be prepared to do some areas several times.

14. In between building the world’s best Gemini, Drago Ostric runs the very successful Sefton Smash. Using PPG 2-K two-pack, he colour-coded the new panels so they were a perfect match with the bright-red Sparco bucket seats.

15. Quite a difference, eh! With the glossy, buffed and polished panels back in place, it’s almost a crime to bolt the seats back in place. When designing and laying out the installation, we were careful to ensure there was no loss in seat travel and that the seat didn’t hit either the amps or subs when moved fully back.
THE CAST:

A) Head Unit: KD-SC945
Not only will JVC’s Vario-Style CD/tuner play regular CDs but also MP3-recorded CDs as well. Better still, its replaceable front facia can be customised to match your interior or personal taste – we went for bright red!
B) Splits: CS-HS601
With their separate tweeter, HPF woofer cone (with Butyl rubber surround and Strontium magnet) along with an outboard 12dB/octave high and low pass crossover, JVC’s CS-HS601 16cm splits provide clear, smooth, powerful sound with multiple mounting options.
C) Subwoofers: CS-LD3250
All subwoofers make bass, but only JVC’s Strobo Woofers have a built-in illumination system that automatically pulses with the beat. These bass pumpers also feature a Hi-carbon cone, Butyl
rubber surround, gold-plated screw terminals and will handle a stout 400W.
D) Amplifiers: KS-AX4500
Power is good! These four-channel beasties are rated at 4x50WRMS, which is certainly grunty. They feature built-in, infinitely-variable, high/low pass crossover, wide-range sensitivity, bass boost, separate RCA inputs along speaker inputs for head units with no RCA outputs.
TWEETER PODS
Holden’s premium audio system has separate tweeters housed up on top of the dash at the far extremities. Rather than re-invent the wheel, we decided to follow their lead and mould the JVC tweeters into the clip-in panels that run across the windscreen.

1. JVC supplies an angle mounting kit for the 25mm tweeters, along with these flush mounts. Note how the lip has been cut down for a neater finish.

2. After determining the tweeter location, cut holes for the supplied mounting cups to sit in. A big drill and a round file will suffice if you don’t have a hole-saw.

3. Bog won’t stick to raw plastic. Use 36-grit sandpaper to roughen the surface and sand away the grain
The tweeters were angled up so they didn’t fire straight into the windscreen. A few dabs of hot melt-glue will hold the cups in place for the time being.


5. Direct sunlight can cause the plastic filler (bog) to lift. Drilling 1/8th holes in the panel gives the bog something extra to hold onto.

6. Wipe the bog on firmly – don’t dab it on or it won’t stick. Think of it as tinning the surface. Give it at least a couple of hours to dry before sanding.

7. While it may be like sanding concrete when it’s dry, sanding bog when it’s soft will weaken its bond to the plastic causing it to lift later on.

8. Blend out the edges with 120-grit paper. Two heavy coats of hi-fill, sand with 400-grit wet-n-dry, apply a coat of gloss black and your tweeter pods should look just like these.
DOOR BUILDOUTS
For best sound reproduction, speakers need to be mounted on a solid, airtight base. VU FOR U’s new door build-outs utilise an MDF base which was then moulded to the door trim using plastic body filler (bog) before being painted in contrasting two-pack black.

1. To make room for the dual, 16cm JVC CS-HS601 mid-woofers in the doors, we decided to sacrifice the factory pocket. Luckily there’s plenty of depth for them.

2. On a piece of 12mm MDF, sit the two grilles close together and trace around them. Using a compass, draw another circle 6mm bigger, then cut along this line.

3. Glue (don’t nail) this to another piece of 12mm MDF that has had the mounting holes cut out. Let the PVA glue dry overnight. Cut out the base, about 8mm around the edge.

4. Chamfer the edge of the MDF base, then mark out where the original pocket and trim need to be cut. Remaining pocket will be filled and moulded into the build out.

5. Trim the excess so the MDF panel sits flat, then neatly mask-off the entire area. Bog doesn’t stick to the tape, allowing direct application to create an exact mould.

6. Precise taping is essential for a neat-fitting mould. Apply bog over the entire area, place the MDF speaker base into position then blend it in with more bog.

7. It looks a bit gnarly, but it’s amazing what lots of filling and a heap of sanding can do. Make sure you give the bog plenty of time to dry before detaching it from the trim.

8. Our new gloss-black panel is attached to the door trim with the original screws at the pocket end, while a couple of wood screws through the door trim into the back of the MDF speaker base takes care of the other end. The whole shebang is then firmly secured to the doorframe with long, countersunk screws covered by the frame of the drivers seat, but watch the glass! Looks pretty trick, eh?


Comments