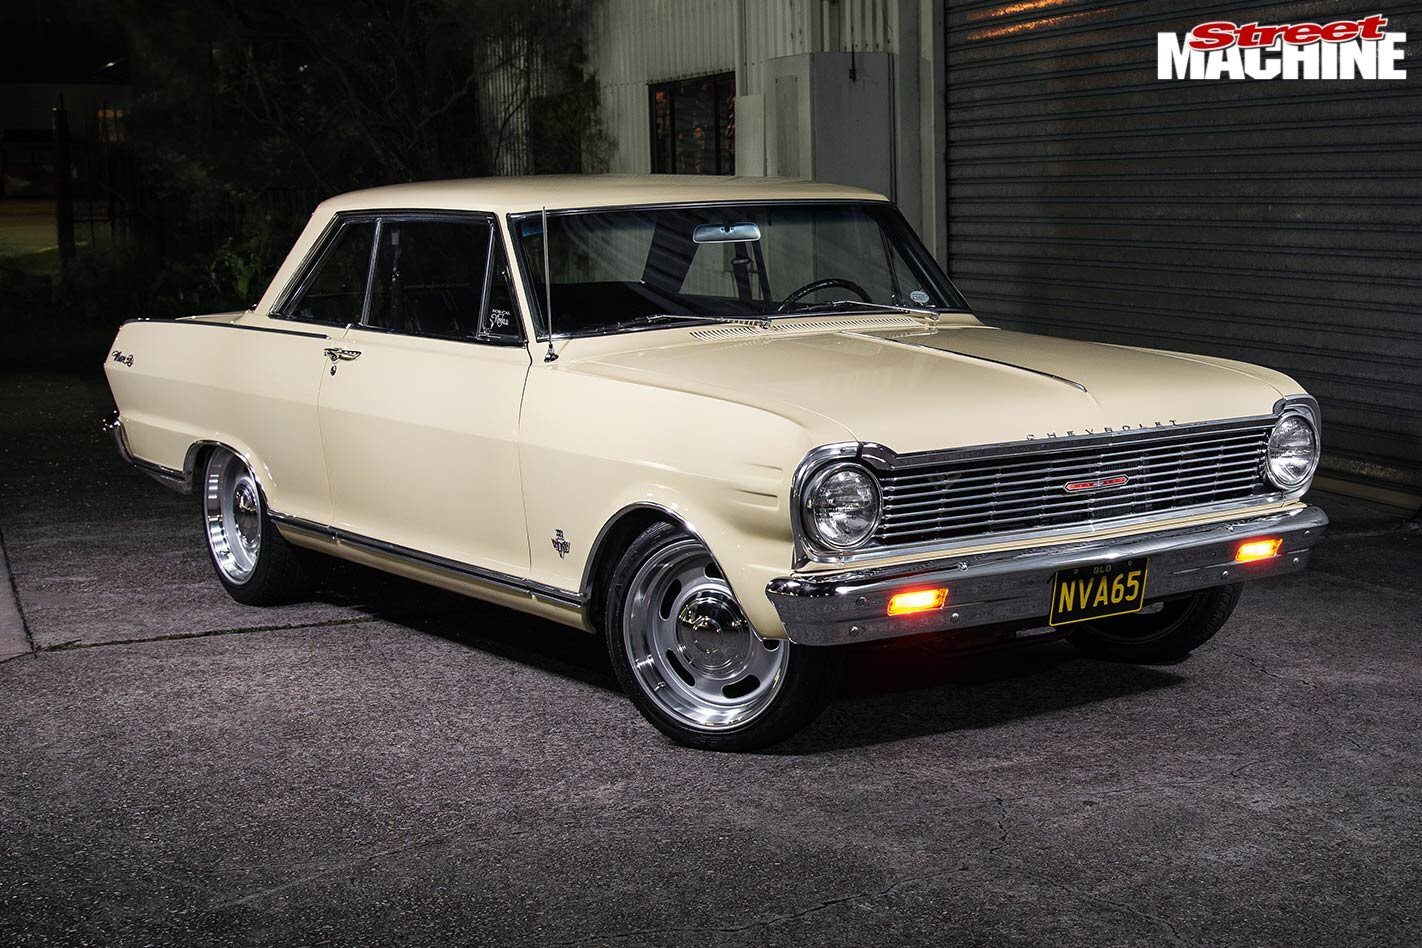
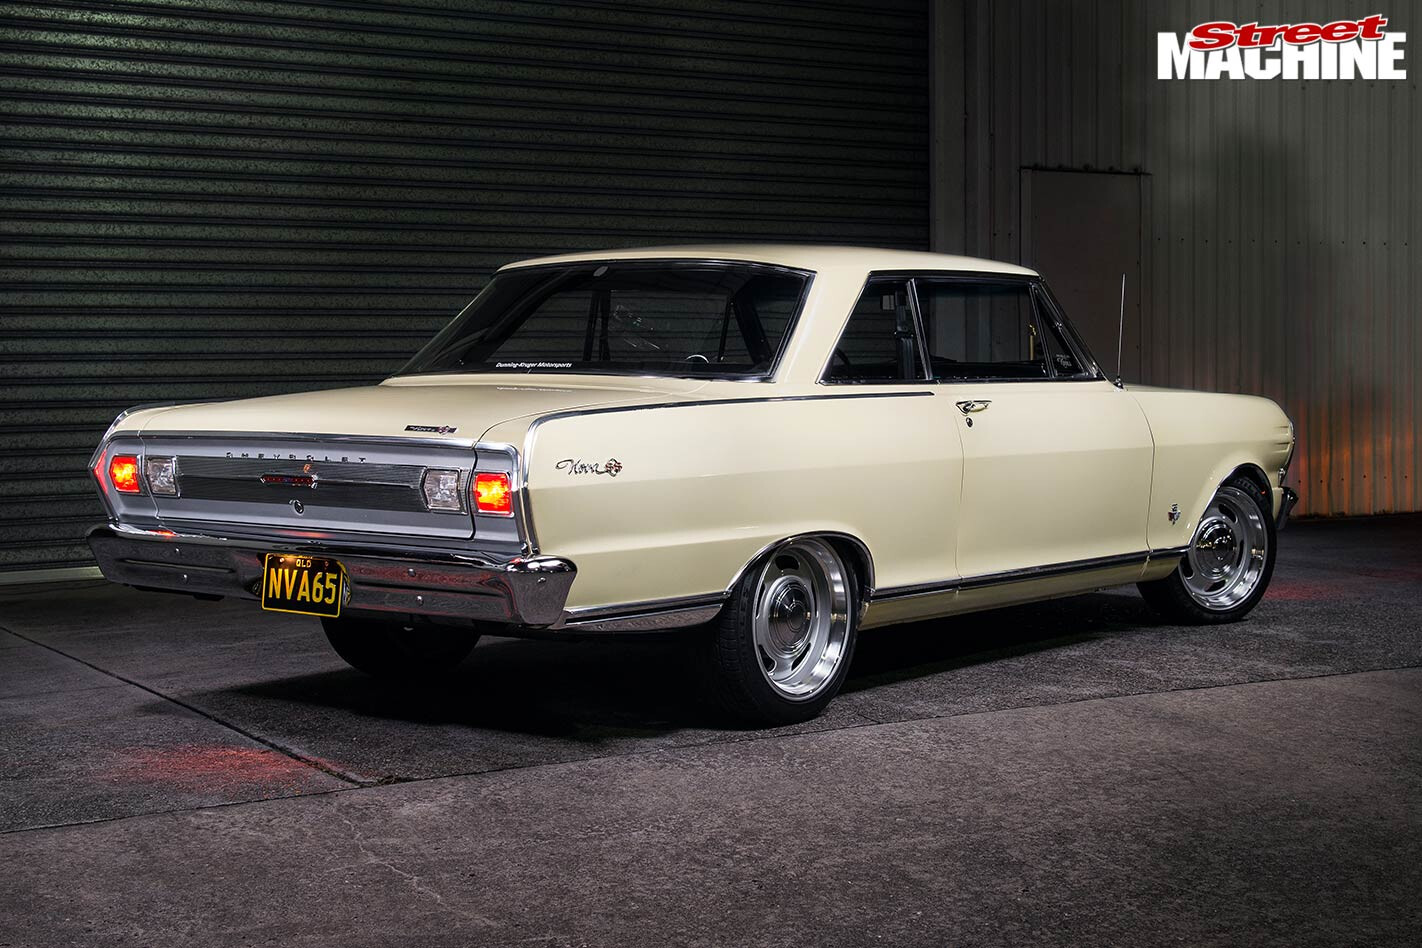
In part one we followed Alan Butler and Ben Wood from The Skid Factory and Aaron Fluegorhnhoeffer from Dunning-Kruger Motorsport, as they fitted a retro-look LS1 into Cam McEwen’s 1965 Chevy Nova SS.
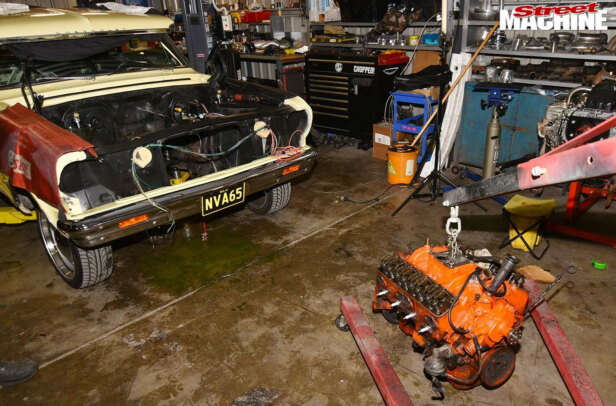
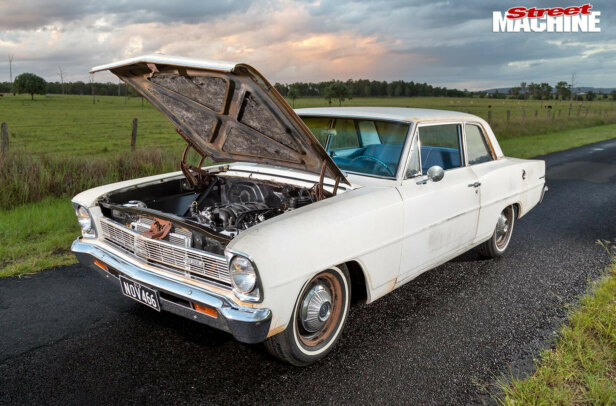
We pick things up this time with the engine and transmission mounted, radiator and fuel system plumbed, and with the car half-rewired.
This article was first published in Street Machine’s LSX Tuner magazine #9, 2019
One headache encountered when fitting the LS was the difference between the Nova X-body platform and traditional A-body and B-body GM platforms. This included the Nova requiring a front-hump sump as opposed to a rear-hump, and the steering box being part of the steering column assembly, chewing valuable real estate in the engine bay. Many LS-swapped Novas in the USA have already had a rack-and-pinion steering assembly fitted to save space
BELT UP
AL ADDED a couple of pulleys so that the belt wraps around the crank and water pump pulleys, improving belt wrap and ensuring the battery stays charged. He also installed a BMW E46 fuel filter and fuel pressure regulator in front of the fuel tank, as these parts are housed in one unit, which also runs an 8mm barb fitting, making it easy to attach fuel lines to it in stock LS deadhead style.
Because Cam’s engine didn’t come with the stock ignition coils, Al used a pair of Subaru WRX coil packs, which he mounted out of sight on the firewall. These items are compact, cheap and run built-in ignitors, which make them a perfect substitute for the LS coils.
BOX O’ SPARKS
AARON finished rewiring the Nova body before tackling the wiring on the LS1, and then mounting the Haltech PS1000 and fuse box in the glovebox. Cam supplied an American Autowire loom, as the wiring in the car had issues from the time he bought it.
“It was getting crusty behind the dash, which was the main area of concern,” says Cam. “From the factory all the power wires for the gauge were sort of joined together in a big junction, and all the wiring there was crusty. The temperature gauge would short now and then, with the dry, crusty insulation on the wires turning into pretty white smoke, which made the inside of the car like a scene from a Cheech & Chong movie. Replacing the loom was just good peace of mind; it fixed issues and gave headroom for adding more electrical load later with thermo fans, EFI and air con.”
Cam refitted the LS1 coil covers for the dyno tuning sessions, in part due to their better sealing abilities compared to the original tin small-block covers. This way he could be sure there were no oil leaks while he got used to the new combo, and the tin covers can go back on at any time now that the left-hand rocker cover nearest to the aftermarket brake booster has been scalloped by Matt at Fiv3 Custom Metal
GAS OUT
WHEN it came to the exhaust, Al spent several days cursing Cam by making a very unflattering voodoo doll. This is because he discovered the only way to make an exhaust work with the Nova’s integrated steering box and column was to send the pipes through the inner guards, making for a complicated and time-consuming job.
Al had trialled several factory exhaust manifolds, but there simply wasn’t space to squeeze an exhaust between the engine, strut tower and firewall, so he broke out the holesaw. With two large holes cut in the top of the guard well, Al was able to build headers primary by primary, with four-into-one collectors moving the exhaust out behind the
front wheels.
With the manifolds built, Al fitted up the new 50mm-longer tailshaft, which was required thanks to the LS mounting further forward in the bay than the previous 283ci SBC. Once the tailshaft was in, Al then ran a full twin 2.5-inch system under the car, dumping at the diff, with a pair of cats welded in near the front.
As the engine had moved forward, Al also had to modify the shifter to suit, using the percussive maintenance skills he was taught when he did his apprenticeship in a Tibetan Buddhist race workshop.
Cam was initially concerned the 283’s original air cleaner assembly would choke up the cammed LS1 and kill power. He tested this theory when the Nova was on the dyno and actually found there was no difference in power output between running the original air cleaner assembly or having the Holley four-barrel throttlebody injection open to the atmosphere
LIVING WITH THE BEAST
THE Nova made 352hp on the dyno, which makes for a serious power-to-weight ratio given it now tips the scales at 1250kg, coming in 50kg lighter with the LS than the previous small-block.
“It goes good!” says Cam. “I’ve not totally flogged it yet for fear of exploding diff and gearbox things, but it revs out nice and quickly, it will skid, and the weight loss over the front feels good.
“Prior to the swap it was being driven sparingly as I was keen to make it better. However, before that it was the kids’ ride to school four days a week plus a regular weekender. It will be back out regularly now it has some more poke as well as running cooler, being more reliable, and just all around better!
“It’s going to be quick, too, as it is no heavyweight. I like that it will be true to the Nova’s roots of a small, light car with plenty of power.”
Cam isn’t sitting still with upgrades, either. One promise he made to his wife when he bought the car was to fit a/c, and this is now in the works.
“I will keep going on this car,” he says. “Vintage Air is coming up, after five years of Queensland summers with me saying: ‘No more summers without a/c’. I also want a quick-ratio steering box and tilt column, LSD rear with disc brakes, and to rebuild the TH350 to take the punishment also known as skids!”
CAPTAIN OF THE SHOEHORN
ALAN Butler has over 20 years’ experience fitting the wrong engines into strange cars, and making them work on the street. The popularity that these builds gained led to he and Ben ‘Woody’ Wood beginning The Skid Factory series on YouTube, initially on Mighty Car Mods’ second channel, but now out on their own. Basically, Al is the bloke to listen to when you start dreaming up a wild engine swap.
“The three questions you should start with are fairly basic,” Al says. “How much does your car weigh and will it be legal? Where is the sump located on the factory set-up? And how big is the engine bay and tunnel? If you have to start cutting tunnels out, that is going to be expensive to replace. This is true even in an HQ, as the Tremec manuals come straight through the main floor support to get the gearstick into the cabin. It’s not just about fitting the engine; it’s the transmission as well.”
Al has made hundreds of sets of custom engine mounts, but finds that getting the engine bolted in isn’t actually the victory point of a given engine conversion.
“Mounting the engine and ’box is about five per cent of the work if you’ve got the sump in the right spot (which is easy with an LS). There is bulk work in the rest of the integration of the swap, like needing a heater. Sometimes the heater lines are in the way of the engine. If you want to move heater lines it can be a huge job, pulling the dash out and mucking around with that.
“Making headers is quite an expensive job, too. It can be $2000 for a set of fairly ordinary headers, because it involves hours of complex fabrication, and it can be a real challenge to have an exhaust that will let an LS make power when it has to fit around crossmembers, sumps, firewalls, strut towers and the like.”
While the big bills can be budgeted for, Al also cautions that a big part of the cost of a custom engine swap are the little fittings, fluids, and hoses.
“Buying hoses for your trans cooler or making radiator hoses fit can be expensive,” he offers. “And if you’re paying someone to do that, that’s more hours of labour to consider.”
WHAT DOES IT ACTUALLY COST?
LET’S cut the crap; an LS swap is going to cost a lot more than just the price of an engine and a pair of mounts. And this is especially true if you’re not swinging off the end of the shoehorn yourself.
Here is a rundown of what it cost Cam to re-power his Nova with the retro-looking LS1. It’s important to note that he scored massively when he bought his LS1, as the engine came with the single-plane Holley manifold ($495) and Terminator injected throttlebody ($1637), which saved him huge bucks.
Also note that this list doesn’t include the cost of the new suspension he had already fitted, or the gearbox or diff upgrades the car now requires to fully use its newfound power.
| DESCRIPTION | AMOUNT |
| Wiring labour | 2000 |
| Engine | 1800 |
| VCM cam kit | 1597 |
| Miscellaneous parts | 1157 |
| Tuning | 1000 |
| Haltech PS1000 | 950 |
| Tailshaft | 950 |
| Wiring loom | 800 |
| Cylinder head overhaul | 770 |
| Exhaust parts | 758 |
| Tanks, inc. EFI fuel tank | 750 |
| Radiator & fans | 541 |
| Tuff Mounts engine mounts | 350 |
| Torque converter | 340 |
| Tuff Mounts rocker cover adapters | 295 |
| Head gasket kit | 276 |
| Rubber hoses | 255 |
| Electrical connectors | 229 |
| Water pump | 213 |
| Ignition leads & boots | 200 |
| Billet coolant overflow | 189 |
| Billet carb bracket | 176 |
| Timing cover set | 174 |
| LS wiring | 150 |
| Sump gasket | 145 |
| LS to TH350 flexplate | 130 |
| Fuel filter & regulator | 125 |
| Tuff Mounts LS coil relocation brackets | 115 |
| Drive belt | 71 |
| O2 sensor | 67 |
| Sparkplugs | 56 |
| Rear main seal | 50 |
| Battery cable | 45 |
| Billet oil cap | 44 |
| Brake parts | 38 |
| Coolant temp sensor | 30 |
| Valve cover paint | 28 |
CAM McEWEN
1965 CHEVROLET NOVA SUPER SPORT
PAINT
Crocus Yellow
ENGINE
Brand: GM Gen III LS1
Capacity: 5.7L
Inlet: Holley dual-plane, Holley EFI throttlebody
ECU: Haltech PS1000
Cam: VCM #710; 232°/234°/110°
Cooling: VZ Commodore radiator and thermo fan
Exhaust: Custom headers, twin system
TRANSMISSION
Gearbox: GM TH350 three-speed auto
Converter: B&M 2400rpm
Diff: GM 10-bolt
SUSPENSION & BRAKES
Front: QA1 adjustable coil-over strut
Rear: Lowered multi-leaf pack
Chassis: CPP tube front arms, brace, front/rear sway-bars, steering arms and chassis connectors
Brakes: Wilwood Dynalite 4-piston disc brakes (f & r), Wilwood dual master cylinders
WHEELS & TYRES
Rims: Wheel Vintiques Chev Rallye; 17×7 (f), 17×8 (r)
Rubber: Achilles ATR Sport; 205/45 (f), 225/45 (r)
THANKS
Alan and Woody at Allied Performance Projects for their knowledge and workmanship on the engine swap and figuring out all the fiddly bits, as well as putting up with my questions and tight spending habits; VCM Performance for the cam kit; Tuff Mounts for the engine-mounting and dress-up gear; Aaron Fluegorhnhoeffer of Dunning-Kruger Motorsports for the rewiring and helping on the engine swap; Iain Kelly for his knowledge on all things old cars; my wife for finally crumbling to the pressure and putting up with my car habit; The Hoff at Cleveland Exhaust for the tuning; the PF boys for the peer pressure, advice and for taking my money in exchange for parts I needed pronto!
Comments