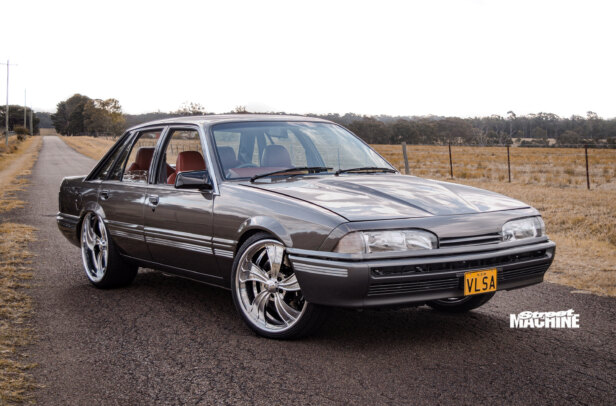
Castlemaine Rod Shop built a supercharged Holden VL to showcase its revamped LS-into-early-Commodore conversion kit
This article on CRS’s LS conversion kit was originally published in the June 2014 issue of Street Machine
SHOEHORNING a big engine into a lightweight car has been the backbone of the performance industry since Henry Ford was a kid. The Chevrolet LS series of engines have been a massive success in this regard, offering gobs of cheap, reliable power and, thanks to their all-alloy construction, relatively low weight.
So throwing an LS into a first-gen (VB/VC/VH/VK/VL) Commodore makes perfect sense – which is why Castlemaine Rod Shop (CRS) developed a kit to do just that in 2000.
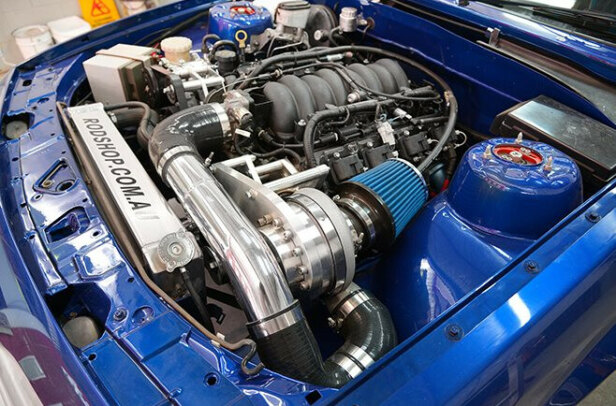
Since then,CRS has united with Waddington Street Rods, revamping old kits and developing new products to add to CRS’s huge inventory. They were keen to revisit the LS-into-first-gen-Commodore kit, as well as show off some new products they have developed – namely a centrifugal supercharger kit for the LS engine, along with new suspension and brake packages.
To showcase all this gear in a real-world environment, CRS/Waddington decided to build a demo vehicle – a VL Commodore – and they invited Street Machine along to watch it all unfold.
STEP-BY-STEP:
1. This one-owner VL Berlina might have lost a bit of its sparkle, but it’s mostly rust-free and the plastics, glass, mouldings and trim are all in good nick. Mind you, with over 400,000km on the clock, the overhead-cam 3.0-litre Nissan six was plenty weary and definitely ready for retirement.
2. Time to remove 27 years’ worth of built-up dirt, oil, grease and crud. Watch for holes in the firewall, as you don’t want to flood the cabin or wash all the muck in there. Block off the original brake and fuel lines if you’re reusing them, to stop any water or gunk ending up in them.
3. The LS engine swap was part of a complete rebuild, so the engine bay was completely stripped for painting. The dash and much of the interior were also removed to allow the new engine harness to be fitted easily. Even if you’re only doing the engine conversion, it’s best to remove as much as practical for maximum clearance.
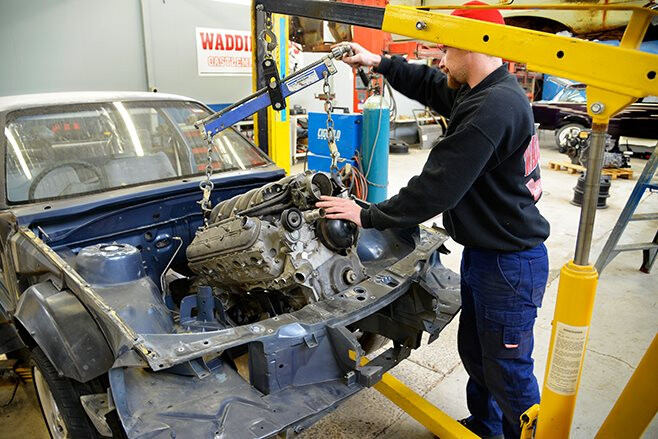
4a. With everything scrupulously clean, CRS/Waddington used a dummy engine and gearbox for a trial fit.
4b. At this point they were still using the existing CRS four-into-one headers, which have generously sized primary pipes. But dummy-fitting the engine and headers revealed a few problems, which they rectified in Step 05.
5a. Trial-fitting the engine and associated hardware allows you to check clearances before painting. This area (above) needed to be modified to make room for the four-into-one headers.
5b. A few taps with a mallet (above) created the necessary clearance. Even so, the headers caused too many clearance issues, so CRS developed a compact tri-Y design that fit much better.
6. Trial-fitting the engine and associated hardware allows you to check clearances before painting. This area needed to be modified to make room for the four-into-one headers; a few taps with a mallet created the necessary clearance. Even so, the headers caused too many clearance issues, so CRS developed a compact tri-Y design that fit much better.
7. The CRS gearbox crossmember uses an OEM-style insulator and bolts up to factory boltholes. The steering rack had to be dropped to slot the engine in. Take a few measurements to ensure the engine and gearbox are correctly located, which will reveal any unnoticed chassis damage. Once verified, check extractor clearance at all points, including steering, firewall and K-frame.
8a. For the nicest possible finish, any brackets and tabs that are redundant with the new LS engine combo should be removed to keep the engine bay uncluttered.
8b. In this case the spot welds were drilled and this bracket levered off (above). Any unused holes should be plated over, welded and ground smooth to seal the engine bay off from the cabin.
9. With the repairs completed and untidy areas cleaned up, around six hours was put into rubbing back the engine bay in preparation for undercoat – which was then also rubbed back. The little detailed areas and hard-to-get-at nooks and crannies make engine bays time-consuming to paint. After masking the hard lines, steering, and K-frame, it was time for the HOK Cobalt Blue Kandy.
10. Compare this fresh-looking ’bay to the one in Step 03! Rather than rubbing back the engine bay between each coat (a big job each time), it received a couple of wet-on-wet coats of colour, followed by a couple of wet-on-wet coats of clear. This is straight off the gun, and really pops when you get it out in the sun.
11. The beauty of buying a relatively clean donor car for the project was that the body only required minor repairs for rust and a few parking-lot dings. This made it the ideal mule when it came to re-engineering the CRS conversion kit. Once again this is straight off the gun, but it will be cut and buffed for even greater lustre.
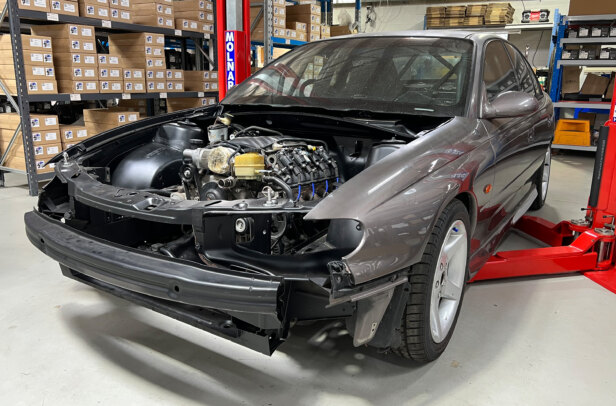
12. CRS chose a 5.7-litre VZ donk, as it was the most powerful of the 5.7s that Holden offered (as opposed to HSV). HP Wrecking supplied the engine along with the matching VZ six-speed T56 gearbox. Early-girl LS engines are getting long in the tooth now, but HP assured CRS that this one was a good, strong runner.
13. One problem with slotting an LS into a first-gen Commodore is starter motor clearance. GM placed starters on the driver’s side, but first-gen Commodores are way too crowded over there, requiring it to be relocated on the passenger side. This is done using a special CRS starter and 8mm-thick adaptor plate supplied in the CRS starter relocation kit (see explanation further down the page).
14. LS ECUs rely on information from the original coolant temperature and oil pressure sensors to control the engine, so the original sensors must be retrained. To allow regular gauges to be hooked up, a couple of different adaptors are required. For oil pressure, a traditional T-fitting is used, with the sender for the VL’s oil pressure gauge screwing into the side.
15. For the new coolant temp sender, there’s a convenient bung at the front of the passenger-side cylinder head, but removing it can require a bit of oomph due to the use of thread sealant. The hole is an unusual size for a gauge sender, so an adapter sleeve is first screwed in, with the sender then screwed into the sleeve.
16. With the addition of a centrifugal supercharger, CRS knew the LS would be capable of serious output. To handle the colossal torque, Clutch Industries supplied one of their beefy Mantic nine-inch twin-plate clutches. Rated at 1370Nm, the Australian-made clutch is fully SFI-approved and is reliable and user-friendly – you don’t need to be Mr Olympia to depress it.
17. Whether you’re fitting the engine and ’box separately, or as one unit, trial-fit them together on the bench before installing. Never force them into position; they should seat by hand, with bellhousing snug against the block/adaptor plate. A thin smear of high-temperature grease on the spigot bush and gearbox input spline can help the mating process.
18. With everything bolted up tight, note how the starter fits snugly into the adaptor plate so that it won’t buck away from the ring gear. To check the starter is engaging correctly, hook up a battery and crank the engine over. You’ll hear a horrible sound if there’s a meshing issue. Also, make sure the pinion retracts when you disconnect the power.
19. CRS chose the T56 as it’s one of the best manual ’boxes around, capable of handling bulk grunt. But it’s big and burly, making it a tight fit inside the tunnel of a first-gen Commodore. A couple of tabs needed to be trimmed, the bleed nipple remotely mounted (braided hose shown) and the hydraulic supply line to the concentric slave cylinder rerouted.
STARTER RELOCATION
To accurately locate the adaptor plate and the gearbox, CRS supplies longer dowels that extend well beyond the plate. Lever the original dowels out with a pair of pliers or side-cutters. Don’t damage the block when doing so – protect it with a piece of wood. Knock the new dowels in with a soft-face hammer (above).
The adaptor plate also moves the gearbox rearwards by 8mm, so a longer spigot bush (supplied) must be fitted so that full engagement is made with the gearbox’s input shaft (above), while a spacer ring behind the concentric slave cylinder (below) maintains full clutch disengagement.
With the starter moved to the opposite side, a splash plate will have to be fabricated to cover the original starter hole. Otherwise crud will get into the bellhousing and onto the clutch.
THE NEXT STEP
In part two of our feature, it’s time to start sliding the engine into the ’bay for good and CRS/Waddington put the finishing touches to this kick-ass, supercharged, LS-powered VL. A full retrim, one of Castlemaine Rod Shop’s very effective Wilwood brake upgrades and a gun K-Shock coil-over suspension system are also on the cards.
Comments